Xamarin Forms using Syncfusion controls and CSLA.NET
How to use Xamarin Forms, Syncfusion and CSLA.NET to build material design mobile apps.


Xamarin Forms is a great UI framework for building Android, iOS, and Windows applications from a single shared codebase. Having experience as a .NET developer and C# working with Xamarin Forms comes as a natural choice. I wanted to build a simple login page that will have the same functionality as Angular Material components in a way that is simple and leverages existing ecosystem.
I will assume that you already have some idea about Xamarin Forms and skip right to the point.
Xamarin Forms Learn More: You can explore Xamarin Forms on Microsoft Docs.
Syncfusion controls
About Syncfusion
Syncfusion is a company that builds and sells UI controls. They cover all relevant platforms, among others Xamarin Forms.
Syncfusion free license: Syncfusion offers community license for individual developers and small businesses. Learn more on Syncfusion Community License.
Controls set like this one from Syncfusion can really save considerable time while developing application. I use Syncfusion components on multiple projects and they are well made and provide a nice API for integrating controls into your project.
Syncfusion controls are distributed via NuGet and that makes it so easy to update them on a newer version.
Learn more about Syncfusion: You can explore Syncfusion more on their homepage
Syncfusion for Xamarin Forms in this example
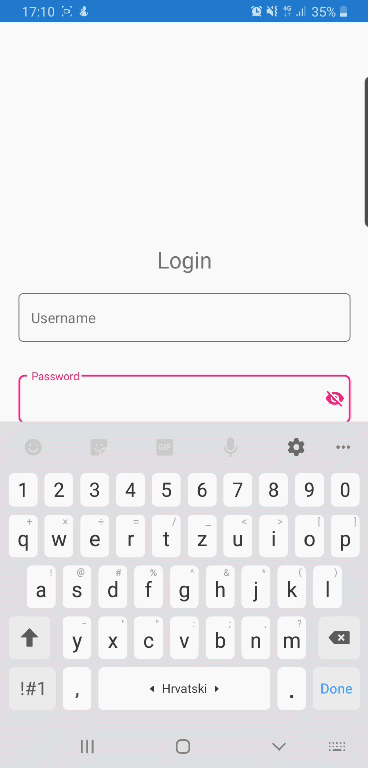
Achieving the Angular Material design look and feel on Xamarin Forms with these controls is trivial. They provide wrapper around the Entry and determine its behavior.
<inputLayout:SfTextInputLayout Hint="Username"   ContainerType="Outlined" Margin="20,0" >
    <Entry   Text="{Binding Model.Username }"  Keyboard="Email" ReturnType="Next" Focused="Entry_Focused" />
</inputLayout:SfTextInputLayout>
Using this wrapper, we can configure desired behavior of an entry:
- Hint
- ContainerType
- EnablePasswordVisibilityToggle
- HasError
- ErrorText
I our example the Entry look and file like this:
CSLA.NET
About CSLA.NET
Not all companies are big enough to have specific teams for each workload. There is a real-world scenario that requires teams to work on multiple projects and multiple technologies. I believe that you should try to standardize the way that code is organized, when possible, the code architecture, and especially some of the base classes that are used for the same purpose across multiple projects. This is where CSLA.NET comes to play.
CSLA .NET is a software development framework that helps you build a reusable, maintainable object-oriented business layer for your app.
Created by Rockford Lhotka, this framework reduces the cost of building and maintaining applications. The framework enables developers to leverage the power of object-oriented design as the basis for creating powerful applications. Business objects based on CSLA automatically gain many advanced features that simplify the creation of Windows, web, service, and mobile interfaces.
– CSLA.NET
CSLA.NET has been around from .NET Framework 1.x and that speaks for itself about the quality and trail of time that this framework has endured.
CSLA is a powerful framework indeed and in some cases, it can have a steep learning curve and intimidate some people with some of its concepts. The good news is that you can chose what to use and what to leave out. Because CSLA.NET provides base classes for common scenarios the final implementation and the scope of adoption of the CSLA.NET is up to the developer.
CSLA.NET in this example
This example uses CSLA.NET base classes to create view models that will bind to the XAML UI, particularly the property metadata:
- Property state and error collections
- Property validation
- Property change notification
The need here is a simple and concise way to get all of this data and bind it to the UI to provide good user experience, but at the same time not to spend too much time implementing this functionality.
CSLA.NET PropertyInfo<T>
Using CSLA.NET BusinessBase<T> base class we will create our own business object for the Login page. The model looks something like this:
[Serializable]
public class LoginModel : BusinessBase<LoginModel>
{
    public static readonly PropertyInfo<string> UsernameProperty = RegisterProperty<string>(x => x.Username);
    public string Username
    {
        get => GetProperty(UsernameProperty);
        set => SetProperty(UsernameProperty, value);
    }

    public static readonly PropertyInfo<string> PasswordProperty = RegisterProperty<string>(x => x.Password);
    public string Password
    {
        get => GetProperty(PasswordProperty);
        set => SetProperty(PasswordProperty, value);
    }
}
Our main point of interest here is the PropertyInfo. It will provide us with all the necessary metadata about the property state that we can bind to UI. Csla.Xaml namespace has an implementation of the visual element that will expose the necessary metadata, and our XAML looks like this:
<csla:PropertyInfo x:Name="UsernameInfo" Path="Model.Username" />
  <inputLayout:SfTextInputLayout Hint="Username"   ContainerType="Outlined" Margin="20,0" HasError="{Binding IsValid, Converter={StaticResource BooleanToReverseConverter}, Source={x:Reference UsernameInfo}}"  ErrorText="{Binding ErrorText, Source={x:Reference UsernameInfo}}" >
      <Entry   Text="{Binding Model.Username }"  Keyboard="Email" ReturnType="Next" Focused="Entry_Focused" />
  </inputLayout:SfTextInputLayout>
CSLA.NET Business Rules
At this point we have set up the XAML binding for our view model. Our view model uses CSLA.NET base classes that implement INotifyPropertyChanged so the class will respond to any change of data as expected. That leaves us to set the business rules for this class. CSLA.NET has a powerful business rules subsystem that is used for both validation and authorization. In this example we will use only validation rules. We add the rules like this:
protected override void AddBusinessRules()
{
  BusinessRules.SuppressRuleChecking = true;
  base.AddBusinessRules();

  BusinessRules.AddRule(new Required(UsernameProperty));
  //Email regex rule
  BusinessRules.AddRule(new RegExMatch(UsernameProperty, @"\A(?:[a-z0-9!#$%&'*+/=?^_`{|}~-]+(?:\.[a-z0-9!#$%&'*+/=?^_`{|}~-]+)*@(?:[a-z0-9](?:[a-z0-9-]*[a-z0-9])?\.)+[a-z0-9](?:[a-z0-9-]*[a-z0-9])?)\Z", "Username is not a valid email.") { NullOption = RegExMatch.NullResultOptions.ReturnTrue });
  BusinessRules.AddRule(new Required(PasswordProperty));
}
The code above added only 3 rules:
- Username is required
- Username must be an email
- Password is required
Each time the property value is set the business rules trigger. And we do not want our user to land on a page and have all the errors shown, and that is why we suppress the rule checking before we add the rules with:
BusinessRules.SuppressRuleChecking = true;
And when user starts editing, we then continue rule checking by invoking this method in the model:
public void ContinueRuleChecking()
{
    this.BusinessRules.SuppressRuleChecking = false;
    this.BusinessRules.CheckRules();
}
The model resumes checking the business rules, validates the model and updates the property metadata, and finally our page responds to that changes updating the UI accordingly.
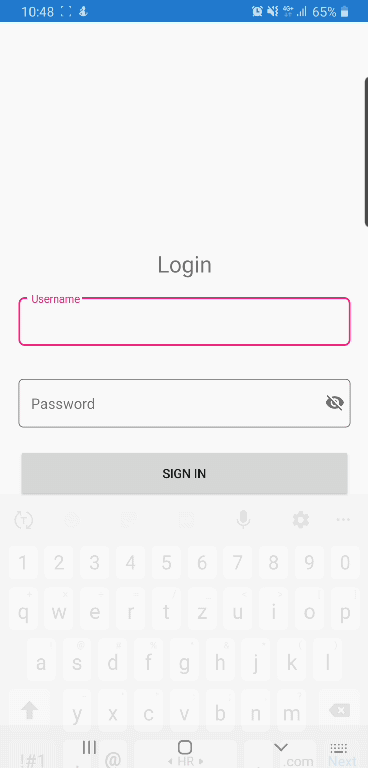
Result
We get the desired behavior, and it looks like this:
Full source code of this example is available on this GitHub repo.